
Introduction
Who wouldn’t like to have an automation that delivers the data you want, in your inbox, on time, without lifting a finger? That is right, No ONE!
Long time in the making, we now have all the pieces to have your reports make its way into your inbox every month ( or year or week or day) enabling you to monitor your KPIs and keep on top of things.
For some context, here is how a scheduled trigger functioned before this update.
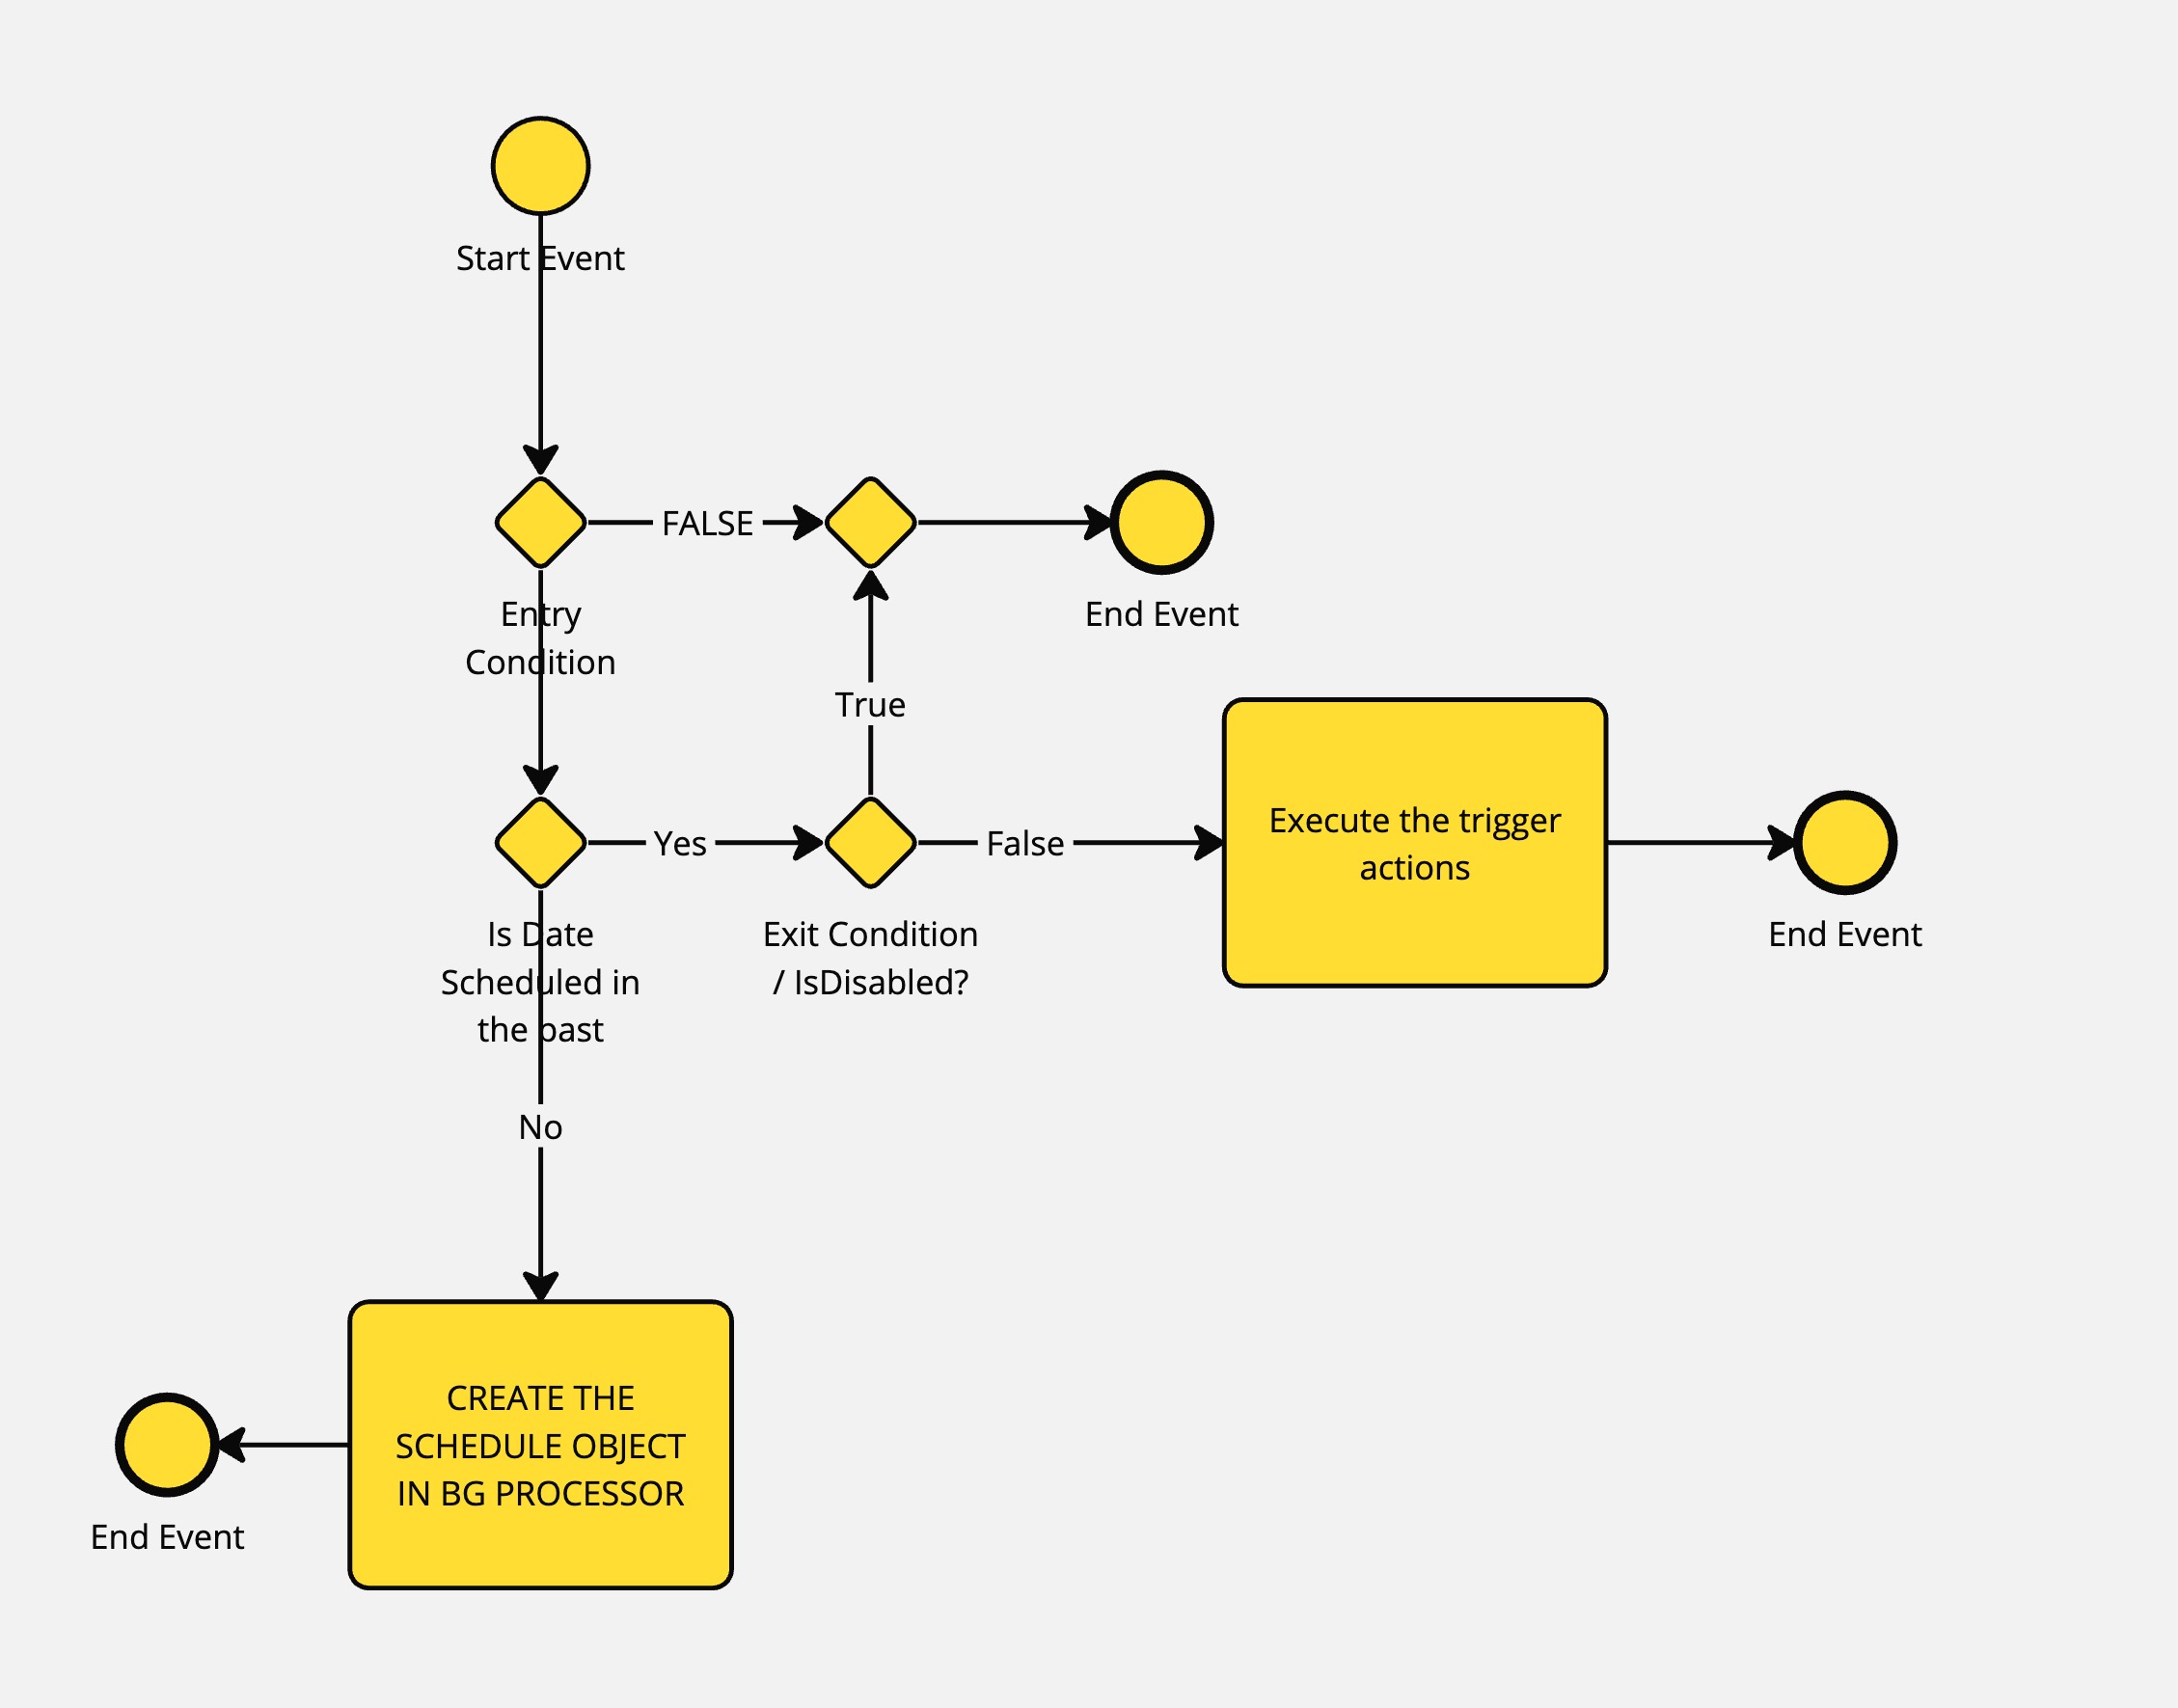
Scheduled Trigger Evaluation Flow
With the introduction of ‘Recurring’ capabilities, the flow changes to the below.
Each recurring scheduled job, once executed, will compute the next schedule date based on the defined frequency.
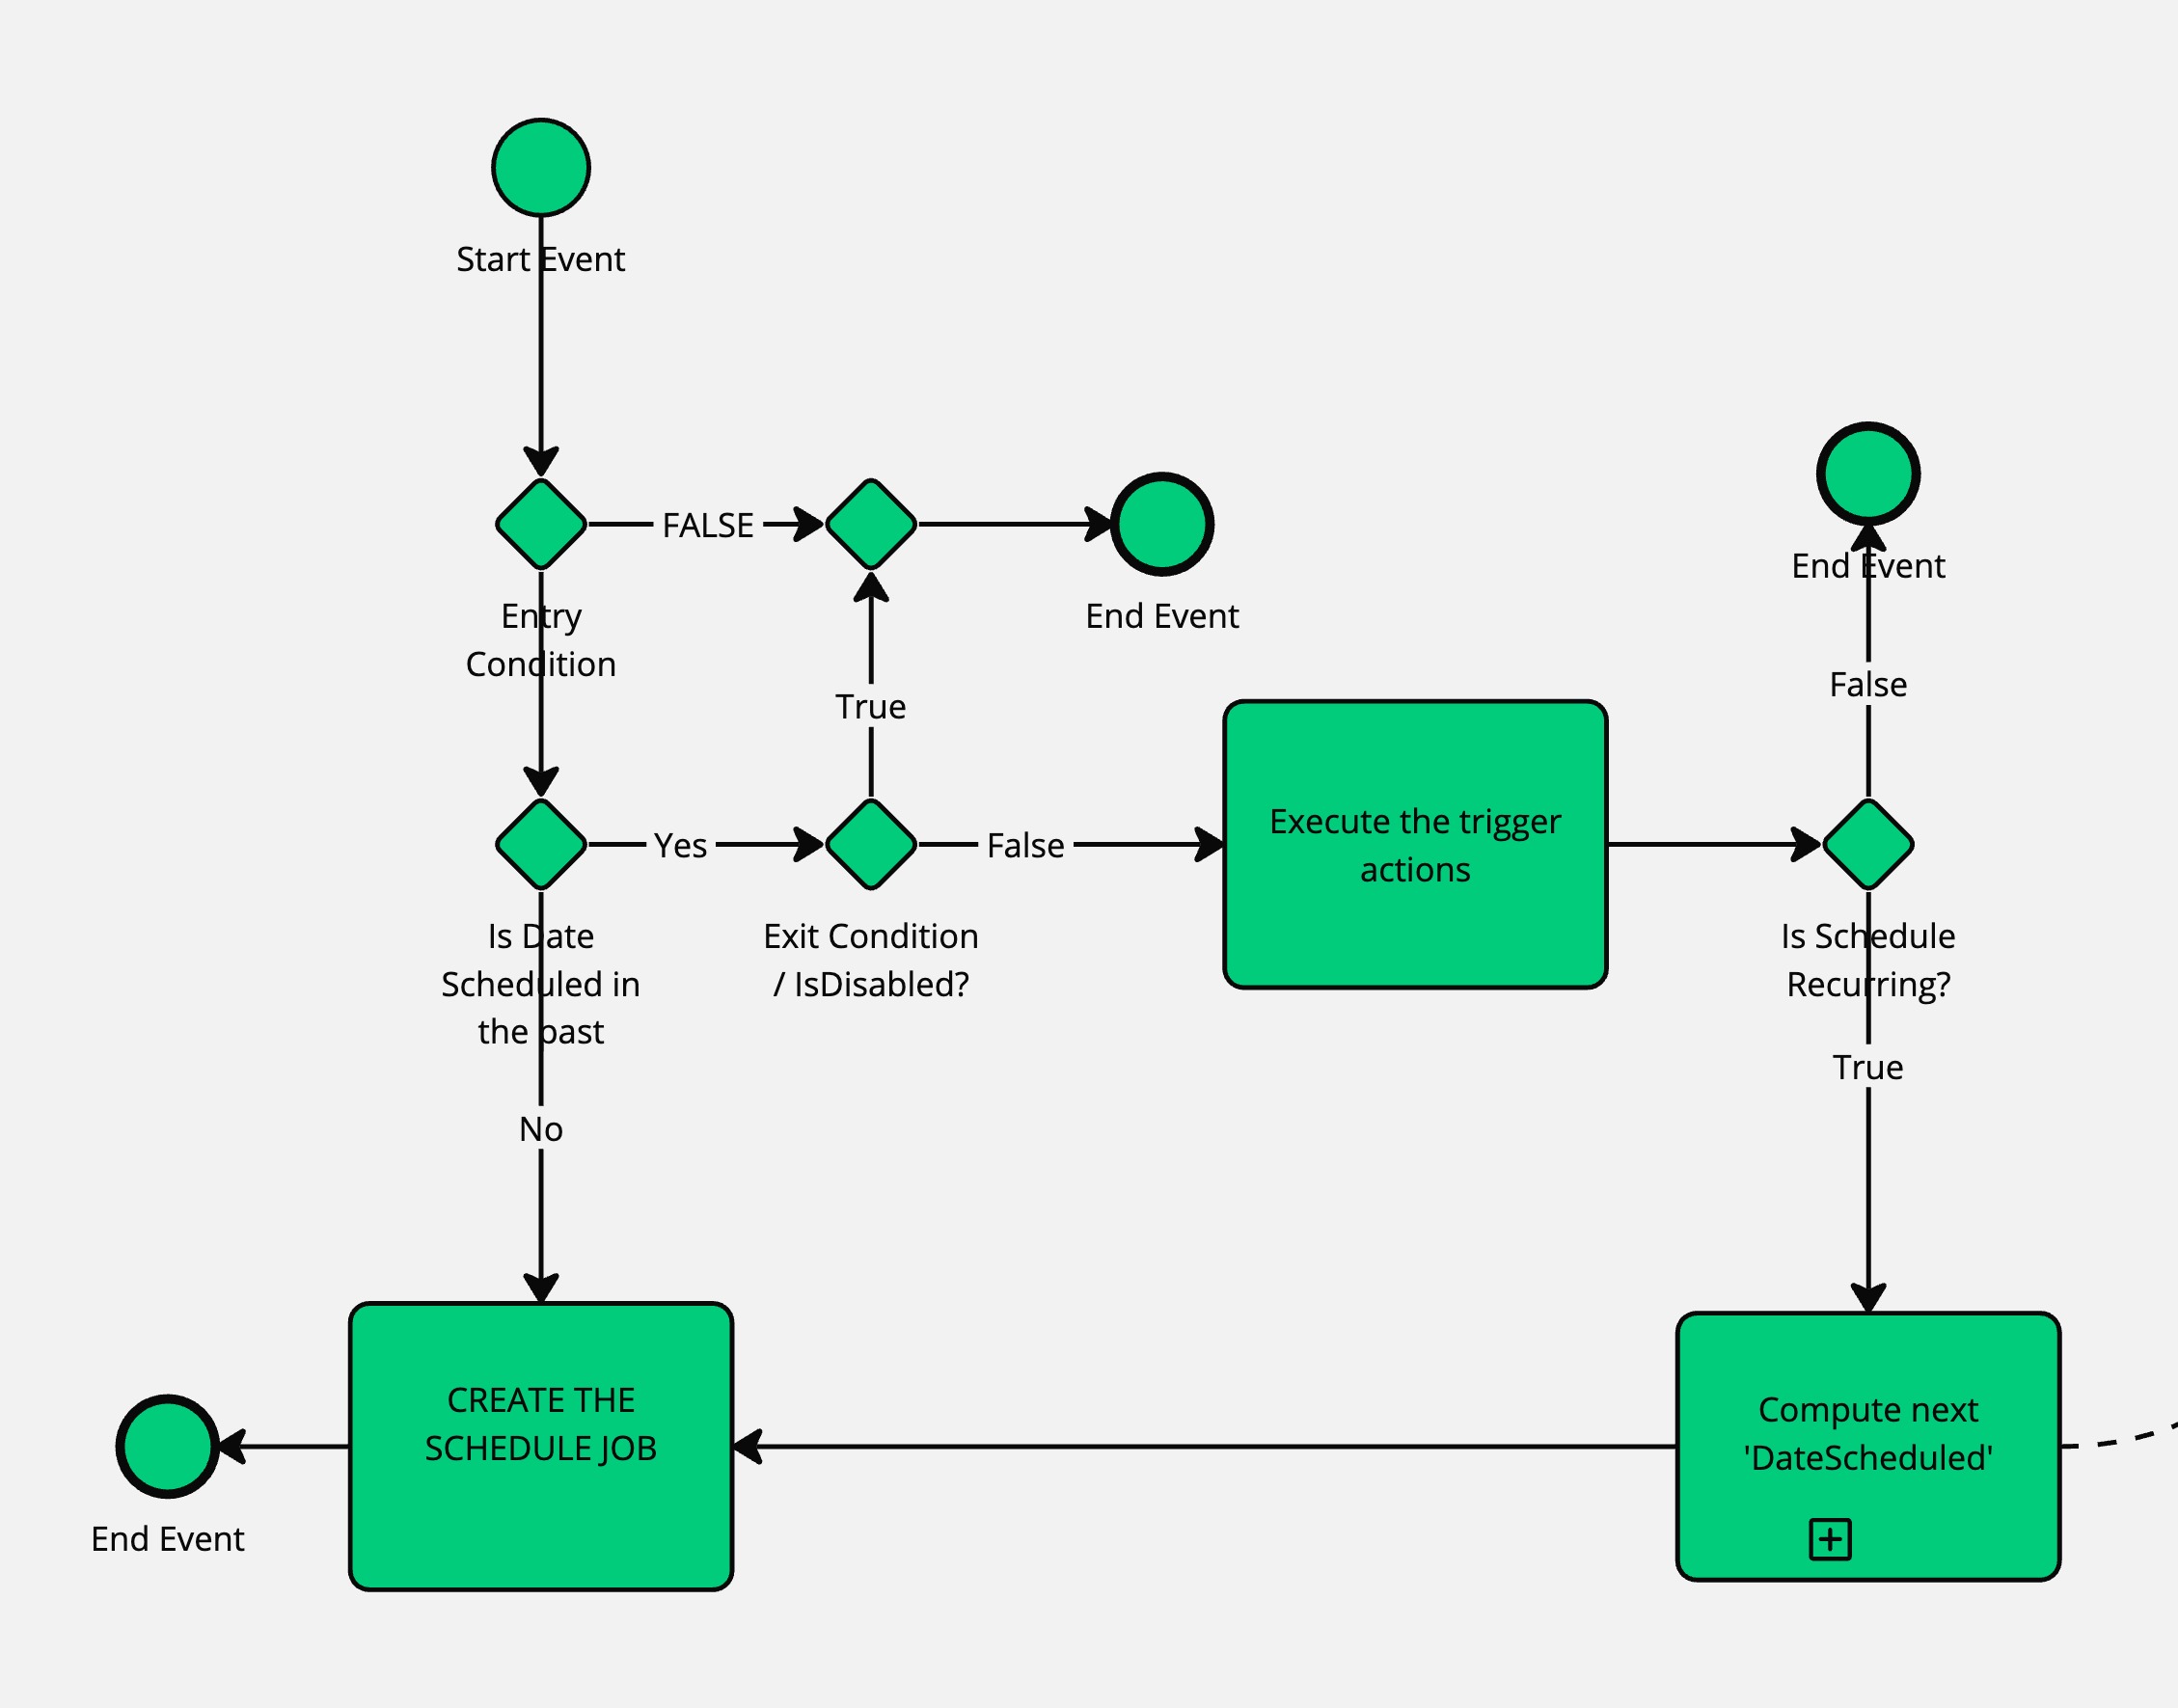
Schedule Trigger Evaluation with Recurring option
Now that we have an understanding of how a recurring schedule works, lets take a look at making a normal scheduled trigger recurring.
Configuring a recurring schedule
Configure the scheduled trigger following instructions at Scheduled Triggers and turn on the ‘Is Recurring?’ switch.
.png)
Recurrence Frequency
Select the desired recurrence frequency.
Yearly - the date and month remains the same for every future execution. If the date is invalid for the next schedule it will pick the closest date. I tried with Feb 29, 2024 6:00 PM PST, a valid date, the next schedule was created for Feb 28, 2025 6:00 PM
Monthly - The date remains the same for every future execution. If the date is invalid for the next schedule it will pick the closest date. I tried with Jan 31, 2025 6:00 PM PST, a valid date, the next schedule was created for Feb 28, 2025 6:00 PM
Weekly - The day of the week remains the same for every future execution. If the initial trigger is on a Monday at 2 PM, it will schedule for the next Monday at the same time.
Daily
Initial Trigger Definition
This is the instance (date/time) when the schedule will be executed. You can define the initial trigger date in 3 ways.
Literal
Define a literal date and time for the initial trigger. This is the simplest option.
Field
Pick the initial date and time from a date or datetime field on the object. When you select this option, you can also define an offset time from the field value.
Offset from trigger
Specify an offset time from the instance when the scheduled trigger is executed. A scheduled trigger is executed when the trigger is not disabled and the entry condition is true.
Recurring Schedule Use Case
The most obvious use case for a recurring schedule is automation of reports. Another one typically used by manufacturers is calibration reminders.
Configuring a monthly RMA report
In this use case, we will look at automating the generation of a monthly report of RMAs that were created in the last calendar month.
Create a track to hold all scheduled recurring reports
First, set up a new track for all your scheduled reporting needs. We will call this track Scheduled Reports. This track should have 3 states: Created, Scheduled and Archived.
Create the following fields
Report ID (Text, Auto-increment, ID Field)
Description of Report (Text, multiline)
Report Recipients (Text)
Initial Trigger Date (DateTime)
Report Frequency (Choice, Choice Options: Yearly, Monthly, Weekly, Daily)
Create field groups, and views as appropriate and assign to roles as appropriate
Create one Display View ‘Schedule Information’
Create ChangeState action for each of the three states.
Create 3 buttons and add to Display View ‘Schedule Information’.
Schedule Report - Add ChangeState to Scheduled action, Set States to Created
Archive Report - Add ChangeState to Archived action, Set States to Scheduled
Reactivate Report - Add ChangeState to Created action, Set States to Archived
Create the filter for the report
We will now create the filter that will give us all RMAs that were created in the previous calendar month are in the state ‘RMA Approved’ each time the scheduled job is run. This filter is created in the RMA track.
Select the RMA track.
Under filters, create a new filter ‘Previous month by date created’
Create the following combined expression
Date When Created LessThan Current Month AND Date When Created GreaterThanOrEquals Last Month.png)
Create a second filter ‘Current State is approved’.
Create the following combined expression
Current State Equals "RMA Approved".png)
Creating the report
In the same track, select reports and create a new report ‘RMAs created in the previous month in state approved’.
Add the required fields to this report.
Add the two filters created earlier and combine using ‘AND’ and save the report.
.png)
Create Email action to send the report as email
Go to the Scheduled Reports Track and select Actions.
Create a new Email action ‘Email-Monthly report for management group’.
Check ‘Add email as comment’
In the ‘To’ section, select ‘Report Recipients’ under ‘Send to Fields’.
Add an email subject and email body.
Add the previously created report in ‘Attached reports’.
.png)
Select File Type as XLSX.
Create Scheduled Trigger
Create a scheduled trigger.
Name the trigger ‘Report Monthly-1st of Month’.
Create the following entry condition.
Current State Changed from "Created" to "Scheduled" AND Report Frequency Equals "Month".png)
Create the following Exit condition.
Current State Equals "Archived"Turn on Is Recurring?.
Set Recurrence Frequency to ‘Monthly’.
Set Initial Trigger Definition to Field.
Select ‘Initial Trigger Date’ under Field.
Set Offset to 0 weeks.
Under Actions, add ‘Email-Monthly report for management group’.
.png)
Save Trigger.
Creating the report object
Go to Agent interface and select the list view for ‘Scheduled Reports’ track.
Create a new report with the following field values.
Description of Report -Monthly management report.
Report Recipients - Add email addresses for recipients, separate multiple emails with comma (,).
Initial Trigger Date - 1st of next month (2025/3/1:10:30 AM).
Report Frequency -Monthly.
Verify current state of object ‘Created’.
.png)
Start schedule using ‘Schedule Report’ button. Current state is ‘Scheduled’.
.png)
Check ‘History’ to confirm job scheduled.
.png)
Now sit back and enjoy those delicious reports each month. Sayonara.